前言
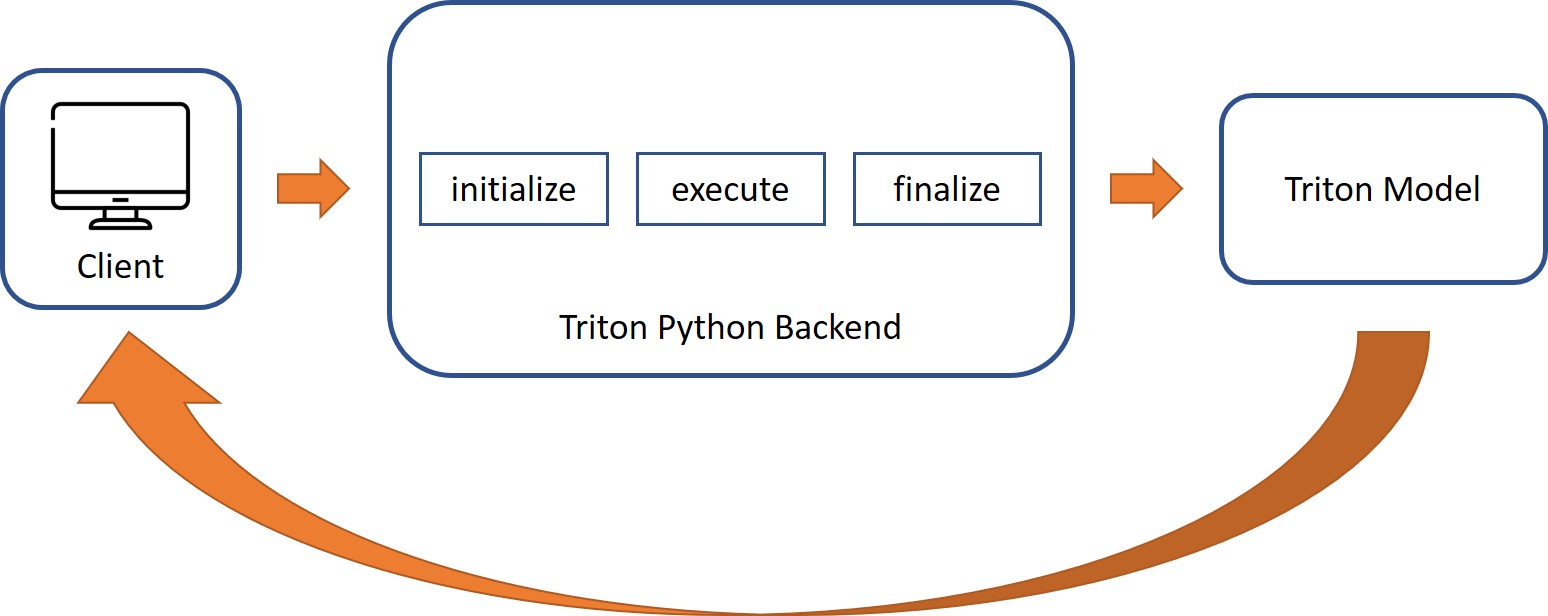
通常在影像相關的模型推論,都會對影像做完前處理後才會丟進模型,以及出來做後處理才會存檔或輸出影像。在前幾篇的範例中,我們將前後處理這兩段放在 Client 端處理,Server 端單純做模型推論,此篇將教學如何將前後處理放在Server 端,並將整個推論流程串起來。
如還未熟悉 Triton 的可以先看此篇 Triton Inference Server 介紹與範例。
介紹
在 Trtion v2.4.0 版之後,正式提出了 Triton Backend 功能,允許使用者自行拓展或客製化推理引擎,使得整個框架更加的靈活,目前支援的後端引擎如下列所示,其中 TensorRT、ONNX Runtime、TensorFlow 及 PyTorch,請依上線的模型自行調整,這邊就不再贅述;OpenVINO 是可運行 Intel OpenVINO 的模型;DALI 則是透過 GPU 來加速數據讀取及處理的框架,將於日後做更詳盡的介紹 – NVIDIA DALI 加速資料載入及處理(未完成)。
以及 Trtion v2.11.0 釋出最新的 FIL Backend 可支援多個機器學習框架(包括 XGBoost、LightGBM、Scikit-Learn 和 cuML)所訓練的森林模型部署。
本篇將介紹如後透過 Python Backend 來進行影像的前後處理。
- TensorRT
- ONNX Runtime
- TensorFlow
- PyTorch
- OpenVINO
- Python
- DALI
- FIL (Forest Inference LIbrary)
流程

需要編寫類別 TritonPythonModel,來處理推論的請求及響應。
其中 TritonPythonModel 包含三個 function:initialize、execute、finalize,基本框架如下。
- initialize : 當模組建立時會被調用,會與設定檔相呼應。
- execute : 當 Client 端發出請求時將被調用,這邊就是放置前處理的地方。
- finalize : 當模組卸載時會被調用,可放置卸載時需要清除的任何事情。
1
2
3
4
5
6
7
8
9
10
11
12
13
14
15
16
17
| import numpy as np
import sys
import json
import triton_python_backend_utils as pb_utils
class TritonPythonModel:
def initialize(self, args):
def execute(self, requests):
return responses
def finalize(self):
|
範例
將用之前Triton Inference Server 介紹與範例中最後的範例來做示範,mnist 模型訓練及 config 設定照舊,Client 端前處理為下所示,這段將移到 Server 端的 Backend 來處理,這樣Client端的程式只需要傳送及接收影像即可,大幅減輕Client端的負擔。
1
2
3
4
5
6
|
img = Image.open('input.jpg').convert('L')
img = img.resize((28, 28))
imgArr = np.asarray(img)/255
imgArr = np.expand_dims(imgArr[:, :, np.newaxis], 0)
imgArr = imgArr.astype(triton_to_np_dtype('FP32'))
|
Server
建立模型庫
模型庫中保存著多個模型包。
除了 mnist 模型之外,後端的模組也是放在這個目錄下,因為多了前處理後端,Client端就不是直接呼叫mnist模型,而是要建立一個 ensemble 來串起前處理及mnist模型
以此範例來說
模型庫為 model_repository
模型庫中共存放了 1 個模型包(mnist)、 1 個 python 後端(preprocess_mnist)及 1 個 ensemble (ensemble_mnist)

編輯後端檔
當 python 前處理後端撰寫完之後,要跟模型一樣寫一個 config.pbtxt ,稍後會有範例說明
可以看到 initialize 為撈取 config.pbtxt 參數及 output 變數名命
execute 為前處理程式碼放置的地方
finalize 本次未使用
1
2
3
4
5
6
7
8
9
10
11
12
13
14
15
16
17
18
19
20
21
22
23
24
25
26
27
28
29
30
31
32
33
34
35
36
37
38
| import numpy as np
import sys
import json
from PIL import Image
import io
import triton_python_backend_utils as pb_utils
class TritonPythonModel:
def initialize(self, args):
self.model_config = model_config = json.loads(args['model_config'])
output0_config = pb_utils.get_output_config_by_name(model_config, "OUTPUT0")
self.output0_dtype = pb_utils.triton_string_to_numpy(output0_config['data_type'])
def execute(self, requests):
output0_dtype = self.output0_dtype
responses = []
for request in requests:
in_0 = pb_utils.get_input_tensor_by_name(request, "INPUT0")
image = in_0.as_numpy()
img = Image.open(io.BytesIO(image.tobytes())).convert('L')
img = img.resize((28, 28))
imgArr = np.asarray(img)/255
imgArr = np.expand_dims(imgArr[:, :, np.newaxis], 0)
out_tensor_0 = pb_utils.Tensor("OUTPUT0", imgArr.astype(output0_dtype))
inference_response = pb_utils.InferenceResponse(output_tensors=[out_tensor_0])
responses.append(inference_response)
return responses
def finalize(self):
print('Cleaning up...')
|
編輯設定檔
mnist 模型設定檔沒動,這邊就沒列出
python 後端設定檔
1
2
3
4
5
6
7
8
9
10
11
12
13
14
15
16
17
18
19
20
21
22
| name: "preprocess_mnist"
backend: "python"
max_batch_size: 32
input [
{
name: "INPUT0"
data_type: TYPE_UINT8
dims: [ -1 ]
}
]
output [
{
name: "OUTPUT0"
data_type: TYPE_FP32
dims: [28, 28, 1]
}
]
instance_group [
{
kind: KIND_CPU
}
]
|
ensemble設定檔
1
2
3
4
5
6
7
8
9
10
11
12
13
14
15
16
17
18
19
20
21
22
23
24
25
26
27
28
29
30
31
32
33
34
35
36
37
38
39
40
41
42
43
44
45
| name: "ensemble_mnist"
platform: "ensemble"
max_batch_size: 32
input [
{
name: "INPUT"
data_type: TYPE_UINT8
dims: [ -1 ]
}
]
output [
{
name: "OUTPUT"
data_type: TYPE_FP32
dims: [ 10 ]
}
]
ensemble_scheduling {
step [
{
model_name: "preprocess_mnist"
model_version: -1
input_map {
key: "INPUT0"
value: "INPUT"
}
output_map {
key: "OUTPUT0"
value: "preprocessed_image"
}
},
{
model_name: "mnist"
model_version: -1
input_map {
key: "flatten_input"
value: "preprocessed_image"
}
output_map {
key: "dense_1"
value: "OUTPUT"
}
}
]
}
|
運行伺服器端
在執行 tritonserver 之前,如有需要額外安裝套件,可在執行前安裝,如此範例需額外安裝 Pillow 套件。
1
| sudo docker run -d --gpus 1 --name Triton_Server --shm-size=1g --ulimit memlock=-1 --ulimit stack=67108864 -p 8000:8000 -p 8001:8001 -p 8002:8002 -v /home/roy/Documents/model_repository/:/models nvcr.io/nvidia/tritonserver:21.09-py3 bash -c "pip install Pillow && tritonserver --model-store=/models"
|
運行伺服器端後,成功的畫面如下所示。

Client
撰寫程式碼
1
2
3
4
5
6
7
8
9
10
11
12
13
14
15
16
17
18
19
20
21
22
23
24
| from PIL import Image
import numpy as np
import tritonclient.grpc as grpcclient
from tritonclient.utils import triton_to_np_dtype
img = np.fromfile('input.jpg', dtype='uint8')
image_data = np.expand_dims(img, axis=0)
triton_client = grpcclient.InferenceServerClient(url='192.168.137.123:8001', verbose=0)
inputs = []
inputs.append(grpcclient.InferInput('INPUT', image_data.shape, 'UINT8'))
inputs[0].set_data_from_numpy(image_data)
outputs = []
outputs.append(grpcclient.InferRequestedOutput('OUTPUT',class_count=0))
responses = []
responses.append(triton_client.infer('ensemble_mnist',inputs,
request_id=str(1),
model_version='1',
outputs=outputs))
print (np.argmax(responses[0].as_numpy('OUTPUT')[0]))
|
運行客戶端
MNIST 測試資料如下圖所示,將圖片放置掛載的目錄下 (如範例 /raid)。

將客戶端環境運行起來後,執行撰寫好的程式碼,即可進行推論。
1
| sudo docker run -it --rm --name Triton_Client -v /raid:/data nvcr.io/nvidia/tritonserver:21.09-py3-sdk bash -c 'python /data/client.py'
|
最後 MNIST 推論結果如下圖所示,可以發現有成功的預測出數字。


