前言
在監督式模型開發階段中,資料標註是體現資料價值的重要步驟,除了需耗費大量人力及時間之外,標註的好壞也會影響模型訓練的準確性,所以加速標註高質量的數據集,是目前各界重視的議題,近幾年來相關工具也陸陸續續的出現。
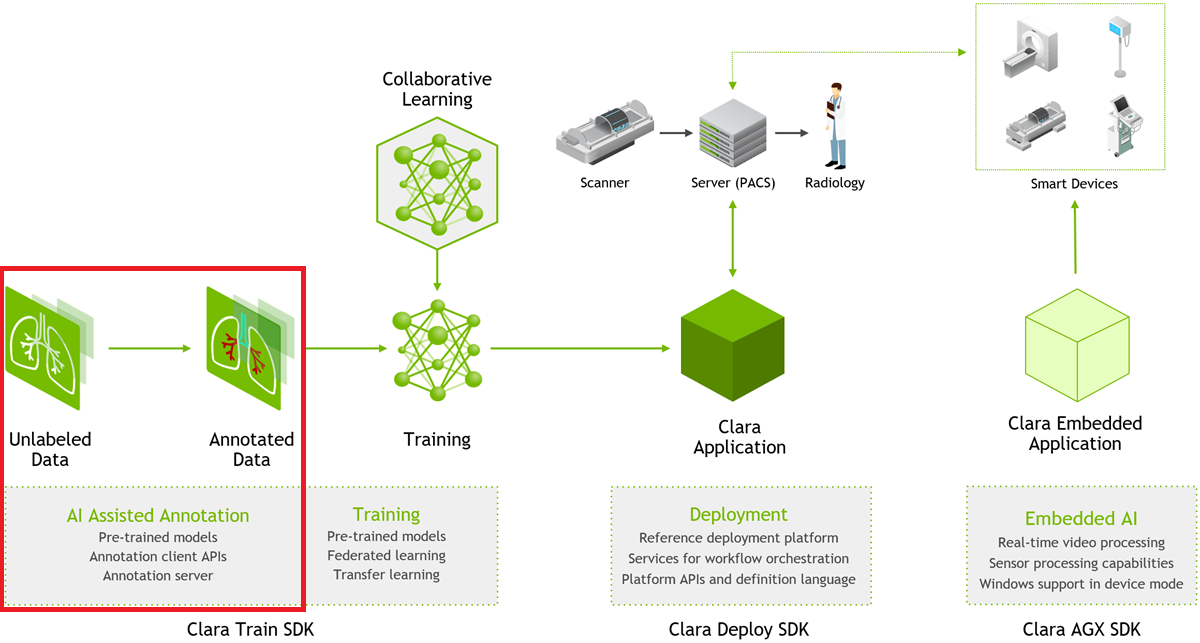
Clara Imaging 是一套能加快醫學影像 (如 CT, MRI, XRAY, PATHOLOGY…) 人工智慧模型開發和部署的應用程式框架,本章將介紹如何使用 Clara Imaging 中的 AIAA 來輔助標註醫學影像,而 Clara 其他功能可參考CLARA SDK 介紹。

介紹
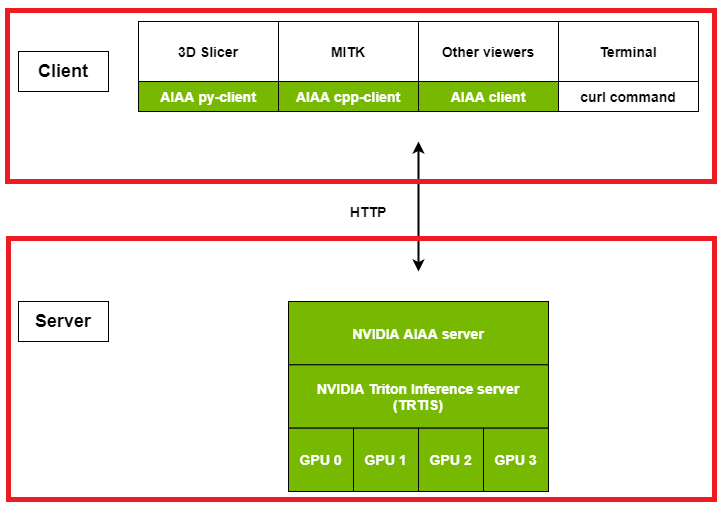
AIAA 走的是 Client-Server 架構。
Server 端主要功能為傳接資料,模型推論及管理。
Client 端則為傳接資料,將未標註的影像送至 Server 端,並接收 Server 端回傳的標註結果。目前有兩套現成的醫學影像處理軟體,有 AIAA Client 的插件:MITK 以及 3D Slicer,可直接跟 AIAA Server 溝通。
或是透過 AIAA Client API,自行結合如網頁、手機 APP 等來實現與 AIAA Server 的通訊。

版本
- Server Clara AIAA : v3.1.01
- Client 3D Slicer : v4.11.20210226
- Client MITK : v2021.02
Server
系統環境
- OS:Ubuntu 20.04
- GPU Driver:460.32.03
- Docker:19.03.14
- Docker Image:nvcr.io/nvidia/clara-train-sdk:v3.1.01
安裝步驟
安裝 Docker
本篇是將系統架設在 Docker 上,可以參考此文章 將 Docker 環境建立起來。
下載映像檔
1 | sudo docker pull nvcr.io/nvidia/clara-train-sdk:v3.1.01 |
運行步驟

運行伺服器端
在運行前需指定此服務要跑幾個 GPU、通訊 Port 以及模型庫的路徑。
1 | sudo docker run -d --gpus <GPU Number> --name <Conatainer Name> --shm-size=1g --ulimit memlock=-1 --ulimit stack=67108864 -p <Host Port>:80 -v <Model Repository Path>:/aiaa nvcr.io/nvidia/clara-train-sdk:v3.1.01 start_aas.sh --workspace /aiaa --monitor true |
Port 80 為 HTTP 協定通道
配置模型設定檔
每個模型皆須有設定檔,系統會根據設定檔來運行模型,最基本的設定檔由 5 大元素組成:基本資訊、前處理、推論資訊、後處理、存檔資訊。
基本資訊 所需的參數如下
- version :
2,3 - type :
segmentation,annotation,classification,deepgrow,others,pipeline - labels : 根據模型輸出格式來依序填入標籤順序
- description : 描述此模型
基本資訊範例如下
1 | { |
前處理 為影像從檔案讀取到進模型之前,所需處理的步驟,每個模型都不一樣,請依照模型需求依序填入,AIAA 有支援的影像處理模組可查閱 AIAA API。
以下為某個模型的前處理範例,處理步驟為讀取醫療影像檔(.nii) -> 調整維度順序 -> 根據分辨率縮放 -> 強度變換,其相對應的模組名稱為 : LoadNifti -> ConvertToChannelsFirst -> ScaleByResolution -> ScaleIntensityRange。
1 | { |
推論資訊 所需的參數如下
- image :
image,volume - name :
TRTISInference,TFInference,建議使用TRTISInference - args : 在建立推論時,所需的參數
- node_mapping : 下面
trtis及tf中所對應的輸入輸出名稱 - additional_info : 額外要傳輸給 client 端的訊息
- trtis : Triton 推論所需的參數配置,
name如果選擇TRTISInference才需要使用,詳細參數可參閱 Triton Inference Server 介紹與範例 - tf : TF 推論所需的參數配置,
name如果選擇TFInference才需要使用
推論資訊範例如下
1 | { |
後處理 為模型推論完成到存檔之前,所需處理的步驟,每個模型都不一樣,請依照模型需求依序填入,AIAA 有支援的影像處理模組可查閱 AIAA API。
以下為某個模型的後處理範例,使用 argmax 計算對應的類別 -> 計算極值並加入至新通道 -> 複製 Properties -> 轉換回原始影像大小,其相對應的模組名稱為 : ArgmaxAcrossChannels -> AddExtremePointsChannel -> CopyProperties -> RestoreOriginalShape。
1 | { |
存檔資訊 為最後推論影像要儲存的格式,AIAA 有支援的儲存模組可查閱 AIAA API。
存檔資訊範例如下,將影像存回 NIFTI 格式(.nii)
1 | { |
上傳模型
根據不同的模型訓練方式,總共有三種打包模型的方法:MMAR、Triton、Tensorflow(CKPT)。
而將模型上傳至 AIAA Server,皆使用 HTTP 請求方法中的 PUT 來上傳。
MMAR
MMAR 為醫療模型檔案目錄的一個標準結構,可用於模型訓練、驗證及推論。
將前面步驟撰寫好的模型設定檔及模型,依照 MMAR 架構放置到對應的目錄,並壓縮 MMAR 資料夾成zip或tar或gz或tgz,即可上傳。1
2
3
4
5
6zip -r <MMAR>.zip <MMAR>
curl -X PUT "<AIAA Server>/admin/model/<Model Name>" -F "data=@<MMAR>.zip"
Example
zip -r seg_spleen_mmar.zip seg_spleen_mmar
curl -X PUT "192.168.0.100:25000/admin/model/seg_spleen" -F "data=@seg_spleen_mmar.zip"Triton
如訓練的模型為 Triton 所支援的格式,直接將前面步驟撰寫好的模型設定檔及模型檔上傳即可。
1
2
3
4curl -X PUT "<AIAA Server>/admin/model/<Model Name>" -F "config=@<Config>;type=application/json" -F "data=@<Model>"
Example
curl -X PUT "192.168.0.100:25000/admin/model/seg_spleen" -F "config=@config_aiaa.json;type=application/json" -F "data=@model.pt"Tensorflow(CKPT)
如果訓練的模型格式為 Tensorflow CKPT,則需先將 CKPT 壓縮後,再跟前面步驟撰寫好的模型設定檔一起上傳即可。
1
2
3
4
5
6zip <Model>.zip model.ckpt.data-00000-of-00001 model.ckpt.index model.ckpt.meta
curl -X PUT "<AIAA Server>/admin/model/<Model Name>" -F "config=@<Config>;type=application/json" -F "data=@<Model>.zip"
Example
zip model.zip model.ckpt.data-00000-of-00001 model.ckpt.index model.ckpt.meta
curl -X PUT "192.168.0.100:25000/admin/model/seg_spleen" -F "config=@config_aiaa.json;type=application/json" -F "data=@model.zip"如果上傳為 CKPT 格式,AIAA Server 接收到後會轉成 TF-TRT 格式。
檢查系統狀態
查看 AIAA Server Logs,預設為最後 100 行,如要看更多行數,需加上 lines 參數
1 | http://<AIAA Server>/logs |
列出全部 AIAA Server 上的模型
1 | http://<AIAA Server>/v1/models |
查看 API 的使用情況,預設帳密皆為 admin
1 | http://<AIAA Server>/v1/dashboard |
Client
系統環境
- OS:Ubuntu 20.04 Desktop or Windows 10
- Client 3D Slicer : v4.11.20210226
- Client MITK : v2021.02
安裝步驟
安裝相依套件
Ubuntu 20.04 Desktop 需安裝相依套件,如果系統為 Windows 10 則不用。
1 | 3D Slicer |
下載 3D Slicer 或 MITK
兩個都是醫學影像處理軟體,擇一下載即可
Ubuntu 20.04 Desktop 下載方式
1
2
3
4
53D Slicer
wget https://download.slicer.org/bitstream/1442746 -O Slicer-4.11.20210226-linux-amd64.tar.gz
MITK
wget https://www.mitk.org/download/releases/MITK-2021.02/Nvidia/Ubuntu%2020.04/MITK-v2021.02-linux-x86_64.tar.gz -O MITK-v2021.02-linux-x86_64.tar.gzWindows 10 下載方式
3D Slicer 下載連結

MITK 下載連結

安裝 3D Slicer 或 MITK
Ubuntu 20.04 Desktop 安裝方式
1
2
3
4
5
6
7
8
93D Slicer
tar zxvf Slicer-4.11.20210226-linux-amd64.tar.gz
cd Slicer-4.11.20210226-linux-amd64
./Slicer
MITK
tar zxvf MITK-v2021.02-linux-x86_64.tar.gz
cd MITK-v2021.02-linux-x86_64/
./MitkWorkbench.shWindows 10 安裝方式
3D Slicer 執行檔案

MITK 執行檔案

運行步驟

串接設備
目前 AIAA 支援大部分醫療影像格式,在跟 Server 端溝通之前,Client 端需先跟各醫療設備或是 PACS 等進行串接。
運行客戶端
以下分別介紹 3D Slicer 以及 MITK 的運行方式,而自行呼叫 AIAA Client API 的方式將在另一篇文章說明。
3D Slicer
第一次使用時,需先下載
NvidiaAIAssistedAnnotation插件,才能使用 AIAA Client 的功能。安裝
NvidiaAIAssistedAnnotation插件步驟如下MITK
MITK 有分兩個版本 (原生版及 AIAA 版),請下載 AIAA 版,並設定好 AIAA Server 資訊後,即可使用,其他 MITK 的功能可以查看官方文件。


上傳醫療影像
將於實際範例中示範
查看推論結果
將於實際範例中示範
範例
本次範例將示範如何部署輔助標註脾臟的模型,並實際拿醫療影像來測試標註結果。
資料集可至 Medical Segmentation Decathlon 下載。
輔助標註脾臟的模型可至 NGC 下載。
Server
運行伺服器端
首先將 AIAA Server 運行起來待命,成功的畫面如下所示。
1 | sudo docker run -d --gpus 1 --name roy_clara --shm-size=1g --ulimit memlock=-1 --ulimit stack=67108864 -p 25000:80 -v /raid/roy/clara:/aiaa nvcr.io/nvidia/clara-train-sdk:v3.1.01 start_aas.sh --workspace /aiaa --monitor true |

配置模型設定檔
下載範例模型及模型設定檔
1 | wget --content-disposition https://api.ngc.nvidia.com/v2/models/nvidia/med/clara_ct_annotation_spleen_amp/versions/1/zip -O clara_ct_annotation_spleen_amp_1.zip |
解壓縮後你會發現這是一個標準的 MMAR 架構,
在 models 可以找到模型檔 (model.trt.pb)
在 config 可以找到模型設定檔 (config_aiaa.json)

此範例的模型設定檔為 Clara v2 的版本,有興趣的人可以先試試轉成 Clara v3 的格式,日後會釋出給大家參考。
1 | { |
上傳模型
直接透過剛剛下載的 MMAR 壓縮檔上傳,成功畫面如下
1 | curl -X PUT "192.168.0.100:25000/admin/model/annotation_spleen" -F "data=@clara_ct_annotation_spleen_amp_1.zip" |

也可以走 Triton 的方式,從 MMAR 中取出 config_aiaa.json 及 model.trt.pb 上傳,成功畫面如下
1 | curl -X PUT "192.168.0.100:25000/admin/model/annotation_spleen2" -F "config=@config_aiaa.json;type=application/json" -F "data=@model.trt.pb" |

檢查系統狀態
開啟瀏覽器輸入以下網址
查詢 AIAA Server logs
1
http://192.168.0.100:25000/logs/

查看 AIAA Server 上所有的模型資訊,可以看到剛剛上傳的兩個模型 (
annotation_spleen,annotation_spleen2)1
http://192.168.0.100:25000/v1/models

查看 API 的使用情況,預設帳密皆為
admin1
http://192.168.0.100:25000/v1/dashboard

進入後可以查看 API 的使用情況

Client
串接設備
由於目前沒有實際的設備可以串接,這邊先以 MSD Spleen 資料集當作範例
運行客戶端
本次範例以 3D Slicer 當作 AIAA Client 端,請先確認已安裝好 NvidiaAIAssistedAnnotation 插件
開啟 3D Slicer ,並設定好 AIAA Server 的網路位置

上傳醫療影像
在 3D Slicer 點選 Load Data

選擇要標註的影像

開啟後選擇 Segment Editor,然後新增一個圖層

為此圖層配色集命名,完成後點選 Nvidia AIAA

選擇剛剛上傳的模型,並開始標註

點選要標註目標物的四周(黃色框框的部分),點完後按下 Start

等待推論結果回傳

查看推論結果
查看推論結果

如果覺得有誤,可透過左方的工具修正

點選 Show 3D 可查看 3D 畫面

確認都沒問題後,就可以存檔

